|

Strategy & Tactics: Starcraft - Zerg
by Bishnu Bhattacharyya
 Zerg Mission #1: Among the Ruins Zerg Mission #1: Among the Ruins
Mission Objectives: Protect Chrysalis, Build Spawning Pool and Hydralisk Den, destroy Terran Base.
This mission is very easy to beat, as the computer very rarely launches attacks on your base. Those that it does are very easy to beat.
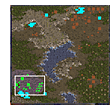
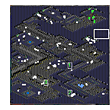
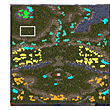
You start out with enough units to protect your base. As you can see in the map, there are Terrans to the North and to the East of your Base. Move your defensive units to just northeast of your Command Center, where they can deal with both directions easily (As in Screenshot #2).

As usual, the first thing you should do is establish your economy. As soon as possible, build a Spawning Pool and Hydralisk Den. You can build the Spawning Pool at the very beginning, but don't bother building any zerglings, it's fairly pointless.
Once your economy is in full swing, make 12 Hydralisks and go to the Terran Base in the northeast corner of the map. The Wraiths there don't cloak, and you should have no problem leveling the base.
 Zerg Mission #2: Egression Zerg Mission #2: Egression
Mission Objectives: Bring Chrysalis to the beacon.
In this mission, the computer AI behaves exactly like it did in the first Zerg mission. Every now and then it will send a couple of Zealots or Dragoons to harass your base. The key to beating this mission is hydralisks. Though this is the first mission where you can use mutalisks, it is not good to do so as the Protoss have several Scouts in the area. A Scout's air to air missile are on par with a Battlecruiser's weaponry. It's air-ground weapons are far less formidable.
You start with a well-established base, and quite a lot of credits. Start your drones working on minerals, and build six drones at your hatcheries. Get your economy established before you build any combat units, as you start with enough defences to get by.
You'll see the chrysalis on a beacon in the top left of the map, beside an Overlord. You'll need a drone to pick it up, but do not waste a drone early in the game, it is fine where it is. Take the Overlord there, however, and move it close to the brown hydralisks. They will divert to your control, and if you click on them you will realize that they have twice the health and deal twice the damage of regular hydralisks. Move the hydralisks just south of your mineral patch and station them there, as that's where the Protoss enemies will come from.
Once your economy is established, build a Hydralisk Den, and churn out 24 Hydralisks, not including the special ones. Then pull a drone off minerals (make sure it isn't carrying anything), and have it pick up the Chrysalis by command-clicking on it. Then split your Hydralisks into groups and move out. Trace the red path on the map, and you should have no problem beating the mission.
 Zerg Mission #3: The New Dominion Zerg Mission #3: The New Dominion
Mission Objectives: Protect Chrysalis, destroy Terran presence.
This mission is very easy if done right. The Terran Base to the north (see map) is crawling with Siege Tanks. It is on high ground, meaning that it is indistructible by a ground assault. Your sole offensive unit should be the Mutalisk.
The Terran's will harass your base very early in the game, with Marines, Vultures, and Firebats. Later it will send a Siege Tank or two, but by then you should be ready.
The first things to do, as usual, are to build up your economy and set up your defences. You start with quite a few units. Divide them between your chrysalis and your mineral patch. That is where the Terran assaults will come.
Bolster your defences until you have about 8 Hydralisks at each defence point. Then build a Spire and begin making Mutalisks. To take over the Terran base you will need 24 Mutalisks, and you do not have enough Vespene Gas at your base to do that. If you look at the map, however, you will see that there is a suitable expansion point in the middle of the map. Send about 4 Mutalisks there and clear out the Terran presence, then send 8 drones and construct your base. Build a Hatchery, Extractor, and several Sunken and Spore colonies around the place. Build up your resources and make Mutalisks, and when you have 24, attack the Terran base.
It doesn't matter where you attack the Terrans, but I suggest the east end first. The first things you should take out are Marines and Missile Turrets. They are the only things that can hurt you. You should easily overcome the Terrans, with minimal casualties.
 Zerg Mission #4: Agent of the Swarm Zerg Mission #4: Agent of the Swarm
Mission Objectives: Protect the Chrysalis until it hatches
When the mission starts, a ten minute counter appears at the top of the screen. After the counter runs out, the Chrysalis hatches, and you get some new mission objectives.
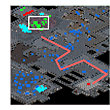
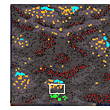
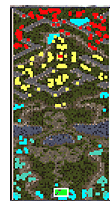
As you can see from Screenshot #1, your base is on an island. The computer harasses you with several assaults, which come via dropships landing Marines, Firebats, and the odd Goliath on your easter peninsula. Move all your hydralisks and zerglings to the east of the Extractor. They will provide adequate defences while you are building up your economy.
Use you Queens to Parasite the droships as they come in, so you can see when they are about to deploy later in the mission. The dropships wander all over the map so you get to see the Terran base, as well.
Once your economy is in full swing, build about 12 Hydralisks, and reinforce your defences. When the timer runs down, Daggoth will get excited, and the Chrysalis will hatch. You now have two mission objectives: Destroy or Infest Raynor's Command Center, and protect the newly-reborn Kerrigan.
Raynor's Command Center is to the East, protected by four missile turrets. If you Parasited the dropships, you should also have a good idea as to what it's other defences are. Siege Tanks, Wraiths, Goliaths, and Marines are all over the place. A ground assault works best here, because you can support it with Queens, but for it to work, you need to expand. If you see Screenshot #1, you'll see a suitable expansion point in the middle of the map. Upgrade your Overlord's speed and research Carrying Capacity. You should also build a Spire and build a dozen Mutalisks. Load 7 Drones and Kerrigan onto an Overlord and proceed to the expansion.
At the expansion, you should use all your drones for structures. Build a Hatchery, an Extractor, and five Spore Colonies. Start making drones and get mineral and gas production underway. Build a Queen's Nest, and research Ensnare. Build about 4 Queens and 36 Mutalisks and attack the Terran Base to the East. Use your Queen's Spawn Broodling ability to instantly kill Goliaths, and use it's Ensnare ability to slow down other enemies. Once you've made it to Raynor's Command Center, attack it with all your Mutalisks (after you've destroyed the surrounding missile turrets) and hover your Queens right above it. As soon as it is damaged adequately, the Queen will infest it and you have beaten the mission.
 Zerg Mission #5: The Amerigo Zerg Mission #5: The Amerigo
Mission Objectives: Bring Kerrigan to the Supercomputer, Kerrigan must survive.
You start this mission with Kerrigan, six Zerglings, and two Hunter-Killer Hydralisks belonging to Daggoth. The second of the three indoor missions in StarCraft, it is quite easy to beat because of the Zerg's ability to regenerate. Between fights have the heal, and try to ensure the survival of the Hunter Killer Hydras, and of course, you cannot let Kerrigan die at all. This walkthrough gives you a couple of ideal places to regenerate, but you can do that pretty much anywhere there are no enemies. There are no opponents who actively see you out.
Take your forces and go southwest. At the end of the passage there will be a Ghost and a couple of Wall Flamers. Your zerglings and Hydralisks should easily kill them. Go up the stairs and continue until you see a door. Cloak Kerrigan and proceed through the door to kill several Marines inside.
Using Kerrigan while she is cloaked is a major part of this mission, but be warned that the hidden weapons, such as Wall Flamers and Floor Autocannons, are detectors.
Once you've killed the Marines, continue past to the beacon, which activates the security camera which shows you the Supercomputer. To the west there is a room of Civilians. Kill them if you want, and continue past the room. You will see a downward staircase. Cloak Kerrigan, descend the stairs, and kill the Vulture there waiting for you. Proceed southeast down the corridor, being careful to hug the northern wall, as there is a ramp to the south where Marines and Ghosts can severely damage your assault force. You will come to a door. This room contains half a dozen Goliaths. Cloak Kerrigan, take her through, and kill them all. Bring your troops in, but do not decloak Kerrigan, just keep going southeast through another door and kill the Marines you enounter. Then walk up the staircase and kill the Ghosts there. Decloak, but do not move Kerrigan. Bring all your forces up to her and continue down the hallway. At this point, five Autocannons (See Area #1 in the map) will pop out of the ground and open fire, but if you act quickly you can kill them without losing any units. Kill the civilian nearby and rest here if you need to.
Continue down the hall going through another door. You will see a bunch of critters penned in a sunken cell. Continue east and you will see a trio of Marines killing a batch of zerglings in a similar cell. Quickly kill the Marines, and go further east to a beacon that opens the doors. Take the newly-liberated zerglings and continue down the hall. A massive group of Marines are lying in wait there (Area #2). There are also some traps (with Detection) nearby, so Kerrigan's Cloak is useless. Instead use her Ensnare spell to slow down the Marines and engage them with your zerglings and Hydralisks. Notice the locked door-you'll come back to it soon. Cloak Kerrigan and take her west, and kill all the Firebats you encounter . Bring all your forces up and decloak Kerrigan, and go north. There is another Marine ambush with detection support, at Area #3. Kill the few on low ground, and again, use Ensnare and your zerglings and Hydralisks. When that's done, trigger the beacons that are up there. One will reveal to you the location of a teleporter, and the other will unlock all doors in the ship. Proceed to the locked door I pointed out earlier and go through it. South past the doorway are a bunch of Firebats and a pop-up Missile Launcher. Kill them with Kerrigan and your Hydralisks. Proceed until you reach the teleporter. Cloak Kerrigan and send her through. North of her are the Marines and Ghosts who shot at your troops from high ground. Kill them one by one, there are no detection traps here. Send the remainder of your forces through the teleporter and head east with Kerrigan, who is still cloaked. At the north, near some grinding gears, are some Marines and a Ghosts. Kill them with Kerrigan, decloak her, bring up your troops, and continue down the path, which turns south. There are some Ghosts and some Missile Launchers at the top of the stairs. Once again, use Ensnare and charge with everything. Once they are killed, head west a bit further to the Supercomputer. Send her to the beacon and the mission is finished.
 Zerg Mission #6: The Dark Templar Zerg Mission #6: The Dark Templar
Mission Objectives: Eliminate Protoss forces, Kerrigan must survive.
In this mission you can use the zerg Guardian, a very powerful flyer evolved from the Mutalisk. It has an extremely long range, and will be instrumental in this mission as they can take out Photon Cannons from far away.
You begin the mission with quite a lot of combat units--enough to protect your base while you are getting your economy set up. There are two ramps leading into your base. Choke them off.
When your economy is established, research burrow and make 24 zerglings. Burrow them in the area around the plateau your base is on so you can see attacks coming. The main Protoss unit you have to worry about here is the Reaver. One shot from these will kill 4 or 5 hydralisks. If you see one of them coming, you should quickly dispatch whatever Mutalisks or Guardians you have. They won't come initially, so you don't have to worry about them at first. You should increase Hydralisk damage at the Hydralisks den, and station 12 Hydralisks at the top of each ramp. They will be your primary defence at your base. You should also have a good sunken and spore colony network protecting you base, as Protoss Shuttles will drop off troops
 When your defences are ready, upgrade Overlord Speed (if you haven't already done so) and research Carrying Capacity. If you look at the map, you'll see a suitable expansion point to the east. Fill your Overlord up with drones and take 12 Mutalisks and expand. Build a hatchery, an Extractor, and a defence grid of sunken and spore colonies for defence. Your mutalisks are there to take out any Reavers that come by, or any units that infiltrate your defence. It is especially important to ensure that your sunken colonies cover your mineral-gathering drones. When your defences are ready, upgrade Overlord Speed (if you haven't already done so) and research Carrying Capacity. If you look at the map, you'll see a suitable expansion point to the east. Fill your Overlord up with drones and take 12 Mutalisks and expand. Build a hatchery, an Extractor, and a defence grid of sunken and spore colonies for defence. Your mutalisks are there to take out any Reavers that come by, or any units that infiltrate your defence. It is especially important to ensure that your sunken colonies cover your mineral-gathering drones.
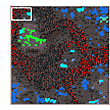
Once your expansion is set up, it is time to build up your offensive forces. Make 48 Mutalisks--you will need to build another hatchery, and mutate 12 of them into Guardians. Now systematically scour the map and one by one eliminate the Protoss. I recommend you go South and circle around. Though the biggest Protoss base is in the southeast, the biggest battle will occur at the location in Screenshot #2, because once you attack there, the computer will reinforce it with all the Dragoons he's got. Have your Guardians hold position, surrounded by Mutalisks, and you should be fine. If you encounter any Photon Cannons, take them out from a distance with Mutalisks. The mission should be quite easy from this point.
 Zerg Mission #7: The Culling Zerg Mission #7: The Culling
Mission Objectives: Destroy the Garm Brood.
In this mission you have to build your entire base from scratch. You start with four drones, and a number of Mutalisks and Hydralisks. Take those force north and have them eliminate the Zerg base there. You should have no problem, but the first thing you should take out is the enemy Spore Colony before it does any damage.
Now, if you want to set up your base really fast, hotkey one of your drones and have them build a Creep Colony on the enemy Creep before it recedes. Then build two hatcheries, and an extractor.
The bulk of your defence will be with Hydralisks. Zerg units cannot cloak, so Spore Colonies are fairly useless. As usual, you establish your resource base and defences. Once you have a Hydralisk Den, make 12 Hydralisks for base defence. Research Burrow and send 12 Zerglings out on wither side of your base to detect any assault forces that come by. Once you have done this, upgrade to Lair, build a Spire and Queen's Nest, and use Queens to Parasite Overlords to recon for you.
Upgrade to Hive, then mutate your Spire into a Greater Spire. You should also build a Defiler Mound. Make one or two Defilers, 12 Mutalisks and 8 Guardians and you are ready to expand. Take the Defilers and cast Dark Swarm. This put's up an Orange cloud making it difficult to attack the units under it to attack you. Take in your Guardians and destroy everything there. Overlords will drop several hydralisks north of the mineral cluster to bolster the enemies defences, but you should have no problem with them. When the enemy has been destroyed, again, try to build some structures on the enemy creep before it recedes. Move your Mutalisks up to your Guardians to protect it from other Mutalisks and Scourge. All attacks against your expansion will come from north of your mineral cluster, so station your Mutalisks and Guardians there. Establish a resource base at your expansion build up your assault force. Attack with Hydralisks, Guardians, Mutalisks, and Zerglings. Also bring in a couple of Queens. If any heavy ground units come, like Ultralisks, use Spawn Broodling. Use Guardians to take out any defensive structures from out of range. If you systematically follow this route, you should have no problem eliminating the Garm Brood and beating the mission.
 Zerg Mission #8: Eye for an Eye Zerg Mission #8: Eye for an Eye
Mission Objectives: Ensure that no Dark Templar escape, destroy the Protoss forces, Kerrigan must survive.
This mission is difficult because it requires you to manage three bases at once. With a little strategy however, you will find that building your base up will not be difficult.
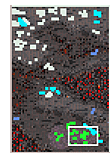
In this mission you can use the Zerg Nydus Canals. They teleport units between your bases, which is helpful because you can safely send troops to defence points. At the very beginning of your mission, send your two Ultralisks through the Nydus Canal to the southern beacon (see map). The bulk of the Protoss attacks will fall on that beacon, but you should reinforce them all. Screenshot #2 shows you a satisfactory beacon defence. Later in the game, the Protoss will send Reavers and Archons at your beacons. You should have no problem if you keep zerglings burrowed to give you an early warning. Remember that since Dark Templar are cloaked, your Overlords should not move from their spots above the beacons.
 When establishing your economy, build drones at all of your hatcheries and send them to your minerals via the Nydus Canals. You should have excellent mineral production in no time. When establishing your economy, build drones at all of your hatcheries and send them to your minerals via the Nydus Canals. You should have excellent mineral production in no time.
This is the first mission you should upgrade your units in, at your Spire, Hydralisks Den, and Evolution Chamber. You should place Queens above your beacons so they can use Spawn Broodling on any Archons that come by. Since Reavers are mechanical units (ie, robots), Spawn Broodling will not work on them. If any High Templar come by, also use Spawn Broodling before they use Psionic Storm.
The upside to these attacks on your beacons are that very few units come to your base. You will need 6 Hydralisks at each hatchery for adequate defence.
Once your base defences are established, build up a force about 12 Mutalisks and 6 Guardians, and take out the Protoss base in the top middle. Expand there, and build up a force of 12 Guardians and 24 Mutalisks. Use them to take out the Protoss Base just north of your Southern Hatchery. Expand there as well. Once your expansions are underway, take a dozen Guardians, four dozen Mutalisks, and a couple of Queens and systematically eliminate every Protoss Base on the map. It is pointless to use ground units, as the Protoss have a huge amount of Reavers, which will decimate them (This also means that Defilers are rather pointless). If you see any Archons coming towards your forces, use Spawn Broodling, and use Ensnare on those Dragoon clusters. With this assault force, your should have no trouble beating the mission.
 Zerg Mission #9: The Invasion of Aiur Zerg Mission #9: The Invasion of Aiur
Mission Objective: Have a Drone mine the Khaydarin Crystal.
This mission is quite difficult for two reasons. There are no choke points for your defence, and the Protoss have Arbiters.
Arbiters can annoy you extremely because of their Stasis spell, a wide area spell, which incapacitates a unit for about one minute. While in Stasis, a unit cannot be hurt, but it cannot be used. You will get the unit back, but by that time the rest of your battleforce has probably been dispatched.
When you begin the mission, do your usual build up minerals/defence. If you look at the map, you will find that you have a lot of area to work with. The Protoss, however, will regularly drop units from Shuttles, so it is a good idea to, again, burrow zerglings to inform you of assaults. The Protoss will attack with Dragoons, Reavers, and Zealots, from all directions. A ringed defence is best, such as the one shown in Screenshot #2, but that is overkill. You should have a wider ring. Spore Colonies are not necessary, but it's good to have a couple of them to knock down Observers. Your chief base defence should be Sunken Colonies and Hydralisks. When you get flying units, use those for defence as they will be able to take out Reavers before severe damage is done.
 When your base is established, take 12 Guardians, 12 Mutalisks, and expand to the east. You should have no problem clearing a path through the Protoss defenders. Set up your new base, and then build up your assault force. When your base is established, take 12 Guardians, 12 Mutalisks, and expand to the east. You should have no problem clearing a path through the Protoss defenders. Set up your new base, and then build up your assault force.
Once again, upgrades will be necessary. It is also advisable that you climb entire tech tree before attacking. When you do, take 12 Guardians, 5-6 Queens, a couple of Defilers, and as many Mutalisks, Scourge, and Hydralisks you can muster. When you send a drone into the beacon beside the Crystal, a 10 minute counter will appear, and the enemy will attack with everything they have. Keep burrowed zerglings out there chiefly to detect incoming Reavers and Arbiters. Use your Scourge to take out Arbiters, and use Spawn Broodling on High Templars, Archons and Dragoons. Plague will work well on Reavers, but try to take them out with air units before they get a shot off.
After ten minutes the drone with a Crystal pops up, and you must take it back to the beacon by your base. Once again, you'll fall under heavy attack. If the Drone is in danger, burrow it. If it dies (and it most likely will), send another drone to pick up the fallen Crystal. You should enclose the drone with all the units you have. The enemy will attack them before they go for the drone.
 Zerg Mission #10: Full Circle Zerg Mission #10: Full Circle
Mission Objective: Destroy the Protoss Temple
Once again, this mission follows the formula of the previous one. You start with quite a lot of minerals and gas. Build a Spawning Pool, Hydralisk Den, and some Sunken Colonies as you start. You may want to build another Hatchery. Now follow the usual build up resources/defences routine, and keep watch with burrowed the zerglings. The computer attacks with all the units at his disposal--including Carriers, but you shouldn't have many problems.
Your defences should consist of 24 Hydralisks, a network of Spore and Sunken Colonies, Mutalisks, and Guardians. Once you have this, it is time to expand. Take 6 Guardians, and 12-24 Mutalisks and attack the western Protoss Base. Expand there, and establish defences. Then take 12 Guardians, 24 Mutalisks, and 12 Scourge and attack the Protoss Base to the east. Expand there, and build up defences again. Upgrade your units as much as possible, as that will make the difference, and by the time you have two expansions resources shouldn't be a problem.
You will need a sizable force to destroy the Protoss Temple in the middle of the map (see map). It should chiefly be air units, such as Mutalisks, Guardians, Scourge, Queens, and Overlords. However, the Defiler's Plague and Dark Swarm are also useful. I recommend loading a few overlords up with Defilers and then unloading them at the battle. Remember to use the Queen's Spawn Broodling on High Templars and Archons, and to use their Ensnare spell to slow down other units. If you see the dreaded Arbiter coming towards you, fly out with your Scourge and destroy it. If you do all this, you should easily destroy the Temple, and beat the Zerg Campaign.
Next up, the Terran Campaign
|
|
|
|
